Illustrator Interface
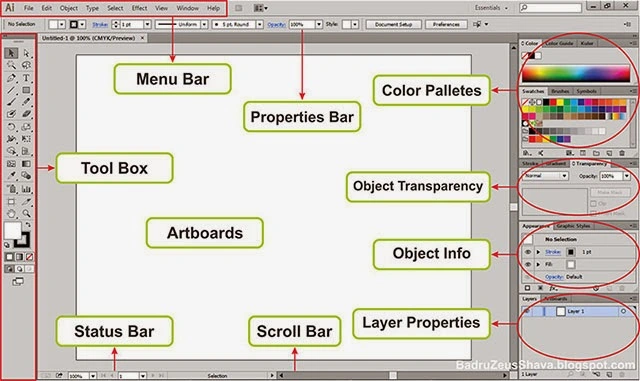
The picture below is an image interface adobe illustrator, where if we see from the pictures that most interfaces adobe illustator consists of menus that are in the tub, where tabs can we expand and we minimize by clicking on the arrow that is next tab name or by double-click the tab name
tool Box
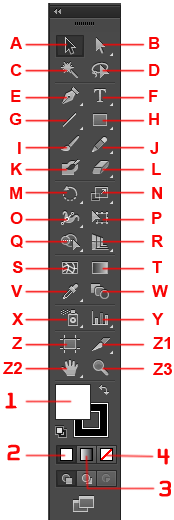
Some of the tool box and Sortcut (shortcut by pressing the keyboard) on the adobe illustrator are:
Some of the tool box and Sortcut (shortcut by pressing the keyboard) on the adobe illustrator are:
A. Selection Tool (V) to choose or select objects.
B. Direct Select Tool (A) To choose or plan more in depth, such as selecting objects in a group. It could also be tricky to select objects that are already joined in a group in detail.Two tool in the tool box is the main adobe illustrator, used to edit or manipulate an object such as pan, coloring, cutting and others. To select more than one object, press Shift + select the object. to create a duplicate object Alt + drag the object.C. Magic Wand Tool To select more than one object that has the same attributes, such as color, line thickness or gradation.D. Lasso Tool (Q) To select objects by analogy noose, which surrounds the object to be selected using this toolE. Pen Tool (P) to create objects in detail point per point or anchor point so as to form a curve. The curve-shaped curve can be open or closed curve. Each point or anchor point has two handles that determine the shape of the curve when shifted with the mouse.
F. Type Tool (T) To create and edit text. Just as the Pen Tool, there are a few additional icons Type Tool when pressed a bit longer.G. Line Tool (\) To create a straight line. Similar to previous tools, there are some additional icon when the tool is pressed for a long time. The indication is a small triangle of each icon Tool Box.
H. Rectangle Tool (M) To make the picture box. Similar to previous tools, there are some additional tools when this icon is pressed for a long time.I. Paintbrush Tool (B) To draw with a brush effect.J. Pencil Tool (N) To draw free / freehand. Suitable for use with tablets. This tool is more or less similar to the Pen Tool. Double-click on the icon will have options to fill the additional parameters.K. Rotate Tool (R) to rotate the object. Press Shift to rotate with the rotation angle of 45 degrees. If the object you want to play as he made copies, press Alt. Double-click on the icon will have options to fill the rotation of an object.L. Reflect Tool (O) to make a reflection or opposite of the object. If the object is reflected, press Alt to create a duplicate object. Double-click on the icon will have the option to fill out the reflection of objects.M. Scale Tool (S) To change the size of the object. If the object is reflected, press Alt to create a duplicate object. Double-click on the icon will have options to fill the object magnification.N. Shear Tool To tilt the object. If the object is reflected, press Alt to create a duplicate object. Double-click on the icon will have options to fill the tilt of the object.O. Warp tool (Shift + R), To distort objects. Double-click on the icon will have options to fill the object parameter change.P. Free Transform Tool (E) To transform objects.Q. Symbol Sprayer Tool (Shift + S) to "spray" the objects that are in the Symbol into artwork. Double-click on the icon will have options to fill the parameter "spray". Click on the first image and then stay Symbol spray on the work area.R. Column Graph tool (J) To create a bar graph.S. Mesh Tool (U) To edit the gradient mesh, such as reducing and adding columns and rows in the mesh. Press the "U" and then click on the row / column mesh akanditambah. To reduce the row / column, press the "-" key while clicking on the row / column. To create a gradient mesh select the object you want to create the mesh its access to the Object menu -> Create Gradient Mesh. Enter the number of rows and columns you want. Click the foreground color from the Swatches tab and select the Eyedropper Tool (I) and then click + Alt at anchor or edge you want.T. Gradient Tool (G) To edit the gradient in the object. Select the object that has been applied gradation gradation and drag the cursor across the object. To create a gradient, select the curve / pathtertutup then press the ">" and then gradation parameter can be accessed on the Gradient tab.
file
In connection with the file as save, open, export, import, and print.
Edit
Menu editing in general such as cut, copy, paste, transform image, and to set preferences for Adobe Illustrator.
object
Contains the command (transform, arrange, group, lock, etc.) to clean layout object.
Type
In connection with the management of fonts, change the font, change the font size (size).
select
In connection with the selection image.
Filters & Effects
Can be used to give a particular effect on the image / object / text.
View
Used to view settings such as image zooming, display scale, and so on.
window
Used to set / display window
Help
To display help and tutorials Adobe Illustrator.
the total Reebonz, the illustrator of a worksheet that can be categorized as shown below:
Illustrator work area of application is basically made up of several components *) include:
1.Menu Bar: The form of the line that contains the controls for various functions such as creating, opening, saving files, export and so on according to the displayed menu.
2.Artboarts: It is a rectangular area which is a place to create and work objects.
3.Tool Box: Contains menu to create or draw shapes, coloring, etc.
4.Color Pallates: Contains the colors used for coloring objects in Adobe Illustrator.
5.Object Properties: Contains information objects such as object coordinates, rotation, fill, stroke, width, height, etc.
6.Layer Properties: Contains layers where the object is located (the same as in potoshop).
7.Status Bar: The line that shows information of the object being worked on, the number of pages, and so on.
8.Scroll Bar: Rollers work area to the left-right or up-down.


No comments:
Post a Comment