WHAT IS NEEDED?
-use photoshop
-use photoshop
-photographed image with the main subject of interest. For example, the portrait of a person.
-The image to be incorporated in the main subject
-Knowledge of the layer mask.
-Knowledge of the use of the brush tool.
EXAMPLE IMAGES USED
STEP 1:
-The image to be incorporated in the main subject
-Knowledge of the layer mask.
-Knowledge of the use of the brush tool.
EXAMPLE IMAGES USED
STEP 1:
-Open a new file. Press Ctrl + N. Set an appropriate size (Example: 1500 x 1000 pixels).
-Then, enter the main subject image into a new file earlier. Click the File menu> Place. Press Enter when the picture's in.
-After that, using the Quick Selection Tool (or any selection tool you are comfortable), create a selection by the subject
-Then, enter the main subject image into a new file earlier. Click the File menu> Place. Press Enter when the picture's in.
-After that, using the Quick Selection Tool (or any selection tool you are comfortable), create a selection by the subject
STEP 2 :
-Then, press the add layer mask icon at the bottom of the layers panel.
-As a result, the image of the main subject will be truncated. See the image above.
-As a result, the image of the main subject will be truncated. See the image above.
STEP 3 :
-Now, convert the image to black and white.
-Click on the add adjustment layer icon at the bottom of the layers panel, select Black & White.
-Then, press Ctrl + Alt + Shift + E to move the layer earlier
-Click on the add adjustment layer icon at the bottom of the layers panel, select Black & White.
-Then, press Ctrl + Alt + Shift + E to move the layer earlier
STEP 4 :
-Click the menu Image> Adjustment> Desaturate.
Close this window and save.
-We're going to file earlier. And the image of nature has to be black and white in the layer.
Close this window and save.
-We're going to file earlier. And the image of nature has to be black and white in the layer.
STEP 6 :
-layer nature image for a while.
-Then, click on Select> Color Range. Color Range window will appear.
-With the cursor, click on the black part on the image layer. See the image above.
-was uploaded to the fuzziness get the desired contrast black and white.
-Press OK and you will find a selection resulting in the layer
-Then, click on Select> Color Range. Color Range window will appear.
-With the cursor, click on the black part on the image layer. See the image above.
-was uploaded to the fuzziness get the desired contrast black and white.
-Press OK and you will find a selection resulting in the layer
STEP 7 :
-Show original image layer nature. Make sure this layer is active.
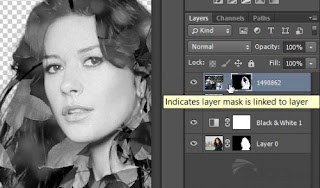
-Click on the add layer mask and see the results in the display above.
IF NECESSARY (ADJUST MASK):
-Click on the add layer mask and see the results in the display above.
IF NECESSARY (ADJUST MASK):
- Select the Brush Tool. Set the smallest brush size: 1px.
- Set the color white.
-Then, randomly, draw lines like scratches on this new layer.
See description above
STEP 9 :
-To show the effect of "erased" at the bottom of the image, we will use the Brush Tool again. Please refer to the image of the tutorial.
-This time, select the type Scattered Brush. See description above
-This time, select the type Scattered Brush. See description above
STEP 10 :
-Select the layer image of the subject person.
-Hide the image layer nature while.
-Add a layer mask.
-Apply a brush with black on the layer mask. See results as above.
-Hide the image layer nature while.
-Add a layer mask.
-Apply a brush with black on the layer mask. See results as above.
STEP 11 :
-Show original layer with the image of nature.
-Repeat steps 10 and get the results as above.
-Repeat steps 10 and get the results as above.


No comments:
Post a Comment