Saturday, 8 April 2017

chinese calligraphy


         Chinese calligraphy is the visual language of the original. Recognized as phonetic script and not in the form of the alphabet. Created in 1800 by TS-ang b.c chieh.Simbol representing each term in words. Logogram or arrow-shaped. Nearly 4300 characters vocabulary of Chinese calligraphy. Chinese calligraphy writing of the earliest identified in 1800-1200 B.C. Known as chia-wen to or bone-and-shell script.
Bone-and-shell script

shaped hieroglyphs found on tortoise shells and animal bones .Recognized as "oracle bone" Chinese calligraphy known as chi wen or bonze script.


Oracle bone

                              bonze skrip


Islamic art (manuscript illumination islam)

hi guys !!

in Islamic countries, whether in Saudi Arabia, Turkey, Parsi or malaysia, islam calligraphy always enjoy the highest place in the hierarchy of art islam.misi they are like gods to copy the word in the Quran .In Malaysia, calligraphy not only to copy newspapers and religious texts such as the hadith, literary history and doctrine of Islam but also its target to write and record all the documents to the king.for example, they had to write letters to respond officially to record the history of empires and their rulers, laws and constitution drafting the traditional to the agreement between the sultan and british east india company. they wrote legends and poetry in Malay Jawi or Arabic letters hijaiyah converted and used in writing Sanskrit Malay Malay to replace the old and the letter does wedge . malaysia early Islamic calligraphy is evidenced by the existence of Malay history, handwriting and literary history of the Malay in Jawi as Tajul Salatin, Hikayat Abdullah, Chronicles of the Kings article and so on.In Malaysia Islamic calligraphy calligraphy not only use only on paper, but they also have written on various media such as stone, wood, pottery, leather palm, fabric and so on .

                                                     Islamic calligraphy carved in stone


                                             Islamic calligraphy shaped carving on wood


graphic design history

hi guys !!

today I want to tell you a bit about the history of graphic design .The field of art is a broad field and involve many areas of life that includes, visual arts, architecture, crafts and the performing arts. we live in a world of mass communication which covers various activities involving the graphic art design. in general, activities involving providers of design information society .The art or graphic design idea is actually a form of conventional easy to understand and draw attention .
visual arts: painting
architecture: sculpture
handicrafts: weaving
                                                                performing arts: dance


graphic design also has a long history. when early humans out to hunt, following animal tracks in the mud is actually a sign associated with the graphics. graphic design is also said to have started with a sketch of the ancient man in the cave known as pictographs, ideographs, symbols, petroglypic, hieroglyphic.

                                                           pictograph: pictorial symbols

ideograph: the idea difficult to understand


                                                     symbol: a summary of the objects


                                                    petroglypic: figura simple form


hieroglyphic, writing in the form of drawings


Sunday, 2 April 2017

DOUBLE EXPOSURE OR MULTIPLE EXPOSURE


WHAT IS NEEDED?
-use photoshop
     -photographed image with the main subject of interest. For example, the portrait of a person.
-The image to be incorporated in the main subject
-Knowledge of the layer mask.
-Knowledge of the use of the brush tool.
EXAMPLE IMAGES USED
STEP 1:


-Open a new file. Press Ctrl + N. Set an appropriate size (Example: 1500 x 1000 pixels).
-Then, enter the main subject image into a new file earlier. Click the File menu> Place. Press Enter when the picture's in.
-After that, using the Quick Selection Tool (or any selection tool you are comfortable), create a selection by the subject

STEP 2 :
-Then, press the add layer mask icon at the bottom of the layers panel.
-As a result, the image of the main subject will be truncated. See the image above.

STEP 3 :


-Now, convert the image to black and white.
-Click on the add adjustment layer icon at the bottom of the layers panel, select Black & White.
-Then, press Ctrl + Alt + Shift + E to move the layer earlier

STEP 4 :

- turn nature into the image file. Click File> Place and select the image of nature. Press Enter when the picture's in.
-Disebabkan we put this image using the place, this layer is a Smart Object format. To make this image to black and white, we need to edit the smart object.
-Caranya, double-click on the layer thumbnail. See the image above.
The new window will open. Only nature image only look

STEP 5 :


-Click the menu Image> Adjustment> Desaturate.
Close this window and save.
-We're going to file earlier. And the image of nature has to be black and white in the layer.

STEP 6 :


-layer nature image for a while.
-Then, click on Select> Color Range. Color Range window will appear.
-With the cursor, click on the black part on the image layer. See the image above.
-was uploaded to the fuzziness get the desired contrast black and white.
-Press OK and you will find a selection resulting in the layer

STEP 7 :


-Show original image layer nature. Make sure this layer is active.
-Click on the add layer mask and see the results in the display above.


IF NECESSARY (ADJUST MASK):


-If the add layer mask earlier, the image does not fit in the space nature mask properly. You can still change it.
-To do this, go to the link between the layer thumbnail to thumbnail mask.
-hen click the layer thumbnail and using the Move Tool, change the position of the image of nature in accordance with your wishes.
-When finished, link layer and mask again.

STEP 8 :


- Create a new layer. Set the layer blending mode from Normal to Overlay.
- Select the Brush Tool. Set the smallest brush size: 1px.
- Set the color white.
-Then, randomly, draw lines like scratches on this new layer.
See description above

STEP 9 :

-To show the effect of "erased" at the bottom of the image, we will use the Brush Tool again. Please refer to the image of the tutorial.
-This time, select the type Scattered Brush. See description above

STEP 10 :

-Select the layer image of the subject person.
-Hide the image layer nature while.
-Add a layer mask.
-Apply a brush with black on the layer mask. See results as above.

STEP 11 :

-Show original layer with the image of nature.
-Repeat steps 10 and get the results as above.


Saturday, 1 April 2017

Aware Interface, Menu Bar and Tool Box in Adobe Illustrator

Before we started using adobe illustrator, we should recognize the interface, menus and tools contained in Adobe Illustrator is complete and comprehensive. Introduction or knowledge of the function interface illustrator, menu illustrator, illustrator tool is a must, because without the knowledge based design process will not be optimal, even though the program that we use is reliable. For that reason, the things below you should really consider it seriously, hehehehehehe.
Illustrator Interface
The picture below is an image interface adobe illustrator, where if we see from the pictures that most interfaces adobe illustator consists of menus that are in the tub, where tabs can we expand and we minimize by clicking on the arrow that is next tab name or by double-click the tab name

tool Box
Some of the tool box and Sortcut (shortcut by pressing the keyboard) on the adobe illustrator are:
A. Selection Tool (V) to choose or select objects.
B. Direct Select Tool (A) To choose or plan more in depth, such as selecting objects in a group. It could also be tricky to select objects that are already joined in a group in detail.Two tool in the tool box is the main adobe illustrator, used to edit or manipulate an object such as pan, coloring, cutting and others. To select more than one object, press Shift + select the object. to create a duplicate object Alt + drag the object.C. Magic Wand Tool To select more than one object that has the same attributes, such as color, line thickness or gradation.D. Lasso Tool (Q) To select objects by analogy noose, which surrounds the object to be selected using this toolE. Pen Tool (P) to create objects in detail point per point or anchor point so as to form a curve. The curve-shaped curve can be open or closed curve. Each point or anchor point has two handles that determine the shape of the curve when shifted with the mouse.
F. Type Tool (T) To create and edit text. Just as the Pen Tool, there are a few additional icons Type Tool when pressed a bit longer.G. Line Tool (\) To create a straight line. Similar to previous tools, there are some additional icon when the tool is pressed for a long time. The indication is a small triangle of each icon Tool Box.

H. Rectangle Tool (M) To make the picture box. Similar to previous tools, there are some additional tools when this icon is pressed for a long time.I. Paintbrush Tool (B) To draw with a brush effect.J. Pencil Tool (N) To draw free / freehand. Suitable for use with tablets. This tool is more or less similar to the Pen Tool. Double-click on the icon will have options to fill the additional parameters.K. Rotate Tool (R) to rotate the object. Press Shift to rotate with the rotation angle of 45 degrees. If the object you want to play as he made copies, press Alt. Double-click on the icon will have options to fill the rotation of an object.L. Reflect Tool (O) to make a reflection or opposite of the object. If the object is reflected, press Alt to create a duplicate object. Double-click on the icon will have the option to fill out the reflection of objects.M. Scale Tool (S) To change the size of the object. If the object is reflected, press Alt to create a duplicate object. Double-click on the icon will have options to fill the object magnification.N. Shear Tool To tilt the object. If the object is reflected, press Alt to create a duplicate object. Double-click on the icon will have options to fill the tilt of the object.O. Warp tool (Shift + R), To distort objects. Double-click on the icon will have options to fill the object parameter change.P. Free Transform Tool (E) To transform objects.Q. Symbol Sprayer Tool (Shift + S) to "spray" the objects that are in the Symbol into artwork. Double-click on the icon will have options to fill the parameter "spray". Click on the first image and then stay Symbol spray on the work area.R. Column Graph tool (J) To create a bar graph.S. Mesh Tool (U) To edit the gradient mesh, such as reducing and adding columns and rows in the mesh. Press the "U" and then click on the row / column mesh akanditambah. To reduce the row / column, press the "-" key while clicking on the row / column. To create a gradient mesh select the object you want to create the mesh its access to the Object menu -> Create Gradient Mesh. Enter the number of rows and columns you want. Click the foreground color from the Swatches tab and select the Eyedropper Tool (I) and then click + Alt at anchor or edge you want.T. Gradient Tool (G) To edit the gradient in the object. Select the object that has been applied gradation gradation and drag the cursor across the object. To create a gradient, select the curve / pathtertutup then press the ">" and then gradation parameter can be accessed on the Gradient tab.
U. Eyedropper Tool (I) To take on the attributes of an object. Where the attributes that will be applied to the object lain.Klik color to an object, and then Alt + click on an object to another. This applies also to other attributes such as text, gradient, stroke and others.V. Blend Tool To change the blending attributes of the object. Double-click on this icon will display the Blend Options menu.W. Live Paint Bucket (K) To fill the color in a group path. This tool is used for coloring objects already terusun more than one path is closed, by "pouring" the chosen color. Suitable for comic or coloring coloring (coloring) to terminate techniques. Click on a group of path, press K then head up the path in question will be highlighted (bold red outline) by bergambat paint bucket cursor. Then with a click to fill the color / gradation on the highlighted path.X. Live Paint Selection (Shift + L) to choose the path that will be stained with the Live Paint Bucket.Y. Slice Tool (Shift + K) To crop an image for the purposes of making a web site. I've never used this tool. Maybe when you're dabbling in web design will take advantage of this tool.Z. Scissors Tool (C) To "cut" or cut a curve or path. Click on the contents of the object to be cut and the other side.Z1. Knife Tool To cut an object. The principle is the same as the Scissors Tool, but with a different approach. Select an object and click + Alt while you drag the mouse equivalent of the object to be cut.Z2. Hand Tool (H) To shift the field of work so that more flexibility in exploring the design that we created. Press space / space bar to shift the field of work.Z3. Zoom Tool (Z) To increase or decrease the work area. Click to zoom out and Alt-click to zoom in.Tips: To switch from color to fill outline or vice versa can by clicking on an icon (X) and click on the desired color, either by double clicking on the icon or select from the Swatches tab. Then to change the fill color to outline or otherwise simply by manually as above or with the shortcut Shift + X. Whenever giving attributes of an object we can use the shortcut:<= Give color to the object.> = Give gradation of the object (default gradation).? = Omit attribute or gradations of color on the object.
 
while the initial introduction of some illustrator tool and its uses, to discuss more details and an application example I will discuss in the next article
menu BarMenu Bar is located at the top of the main dialog box system. menubar is a set of commands that contain other sub command.
like the example shown below, so it is in the menubar other sub-menu that has the function of each

file
In connection with the file as save, open, export, import, and print.
Edit
Menu editing in general such as cut, copy, paste, transform image, and to set preferences for Adobe Illustrator.
object
Contains the command (transform, arrange, group, lock, etc.) to clean layout object.
Type
In connection with the management of fonts, change the font, change the font size (size).
select
In connection with the selection image.
Filters & Effects
Can be used to give a particular effect on the image / object / text.
View
Used to view settings such as image zooming, display scale, and so on.
window
Used to set / display window
Help
To display help and tutorials Adobe Illustrator.
the total Reebonz, the illustrator of a worksheet that can be categorized as shown below:
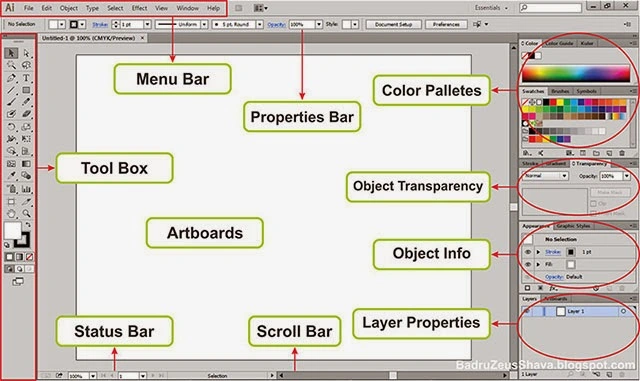
Illustrator work area of application is basically made up of several components *) include:
1.Menu Bar: The form of the line that contains the controls for various functions such as creating, opening, saving files, export and so on according to the displayed menu.
2.Artboarts: It is a rectangular area which is a place to create and work objects.
3.Tool Box: Contains menu to create or draw shapes, coloring, etc.
4.Color Pallates: Contains the colors used for coloring objects in Adobe Illustrator.
5.Object Properties: Contains information objects such as object coordinates, rotation, fill, stroke, width, height, etc.
6.Layer Properties: Contains layers where the object is located (the same as in potoshop).
7.Status Bar: The line that shows information of the object being worked on, the number of pages, and so on.
8.Scroll Bar: Rollers work area to the left-right or up-down.


public holiday in Malaysia

Villaku, Pahang

VillaKu Residences located in Kuantan Balok is two villas that have been combined into one.
Each villa can accommodate 18 people and has its own private pool.
The location and design of Villa attractive make this place ideal for a holiday with family, friends or can be used for wedding by the beach

When you're happy with a swimming pool, you can go to the beach a few steps away from the calm sea.

address:Lot 28195, Kg Pantai Balok, 26080, Balok, Kuantan, Pahang
no.phone : +6019 266 9669
Instagram: Villaku Residence

Tadom Hill Resort, Selangor

If you are looking for a different destination with an excellent price for a vacation with friends, Tadom Hill Resort is sure to be your first choice.
You can find Tadom Hill Resort in Banting, Selangor. If you realize this resort already gone viral on social media.
This is because visitors to this resort not only can choose to spend the night in the open chalet or camping, they can also enjoy the natural beauty that can be found there. To avoid the hot midday sun, plunge it into a lake that is there


address :  Kampung Labohan Dagang, Banting, Selangor, Malaysia
no.phone : Reception (9am – 10pm) – +6012 522 5908
                  Reservation (9am – 5pm) – +6012 522 5728
Facebook : Tadom Hill Resort
Instagram : Tadom Hill Resort
Laman Web : tadomhillresorts.com


Fig Tree Hill, Pulau Pinang


Fig Tree Hill Penang offers a calm atmosphere to relax with family. Just a 15-minute drive from Penang airport, this resort will make you forget the hustle and bustle of town and just leave

addres :Jl. Kenari, 11900 Bayan Lepas, Pulau Pinang, Malaysia
no.phone : +6019 362 0270

Sailors Rest, Pahang

If you are looking for an overnight stay on a boat, you need to Sailor's Rest Bentong, Pahang. This boat can accommodate 2 people and have a rest and a separate living room.

If sleeping on the water instead of on your agenda, you can opt to stay in a chalet or a picnic in the camps provided

addres : Lot 8592, Lorong Dato Panglima, Kg. Sg. Lurau, Janda Baik, 28750 Bentong, Pahang
no.phone : +6012 360 9227 | 603-4292.7036
Laman Web: sailorrest.com


Casabrina Villa, Pahang


Only an hour from Kuala Lumpur if you are driving, Casabrina Villa Pahang is a place where luxury and natural beauty meet.
The combination of forest and 6 star hotel comfort makes this resort ideal for nature lovers who prefer comfort


Relax in the infinity pool while enjoying a stunning view of the forest. Activities that you can do here include golf, jungle trekking and safaris.

addres Jalan Tras, Mukim Tras 27600 Raub, Pahang
no.phone :  +6016 980 3222
Facebook: Casabrina Villa’s
Instagram: Casabrina Villa’s
Laman Web: casabrina.net